
The UKMLA will be one of the most significant exams in your medical school journey, and it can seem daunting, especially given there is so much content to cover. Despite this, success isn’t about covering everything, but about covering the right things in the right way. This guide provides you with the framework needed to break down the content map, build a solid foundation and ensure you are fully prepared to pass. Hopefully, by the end of this article, you will have the tools needed to create a comprehensive revision plan.
Step 1: Understand the MLA
The UKMLA (United Kingdom Medical Licensing Assessment) is an exam that all medical students must pass before they can become doctors. It was brought about to ensure a common standard is set for medical Graduates. International doctors take the MLA.
In order to best prepare for the UKMLA, it is important to understand what may come up in the exam and how you will be examined.
The exam is split into two parts:
- Applied Knowledge Test (AKT)
- Clinical and Professional Skills Assessment (CPSA)
Guide to the Applied Knowledge Test (AKT)
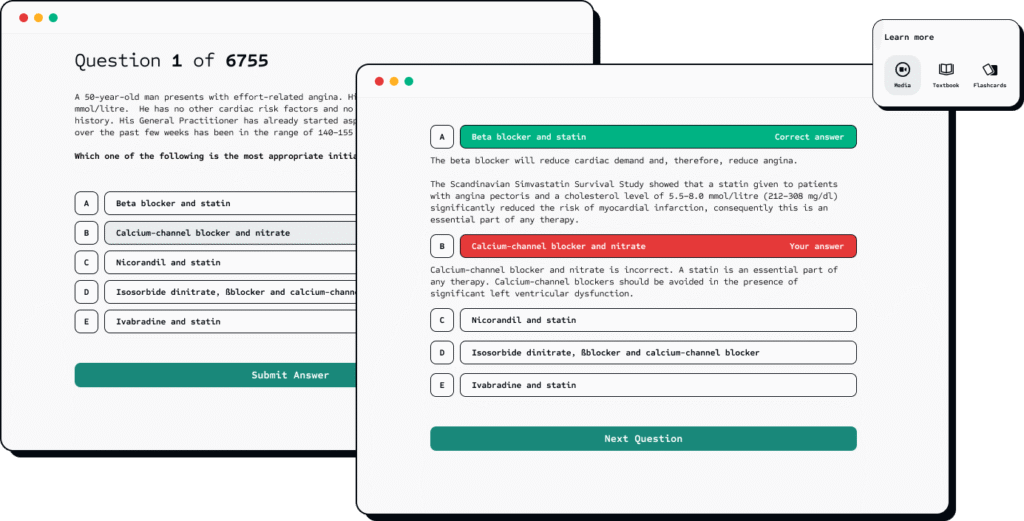
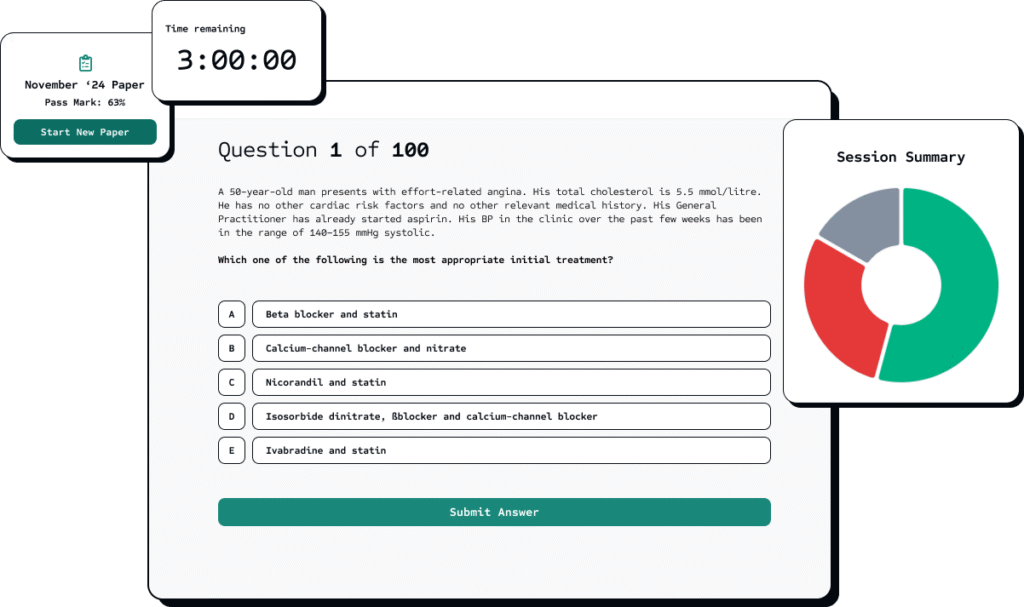
The AKT is a computer-based exam, taken on the Medical Schools Council’s assessment platform, Exam-Write®. It comprises 200 Single Best Answer (SBA) questions, split into two papers, each with 100 marks. Both papers are sat back-to-back on consecutive days, each paper lasting 2 hours. It is run on a national level but delivered by each medical school on one of four dates each year. All questions for each sitting are chosen randomly from a large question bank.
💡Each AKT paper is two hours long. This means that you have around 72 seconds to answer each of the 100 questions!
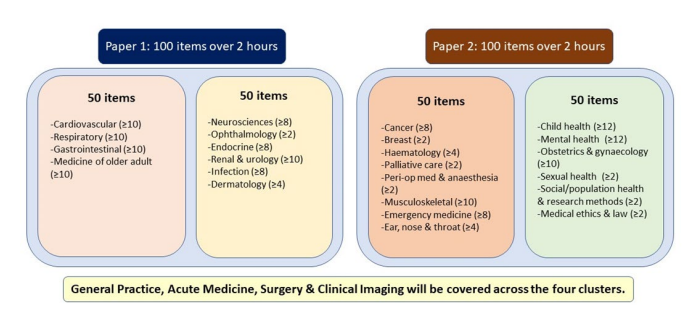
Below is a breakdown of the exams by topics and marks awarded. It is optimal to know all content in depth; however, if you are spending a lot of time on ophthalmology and finding it really hard in the weeks leading up to exams, it may be better to focus on cardiology which is high yield (as shown by this image).
The General Medical Council provides an MLA content map. Because the exam is derived directly from this map, treating it as your primary roadmap rather than just a reference document is a very effective way to optimise your studying.
Here is the best way to use the Content Map to maximise your score.
Traffic Light System
- Traffic Light System: Don’t just read the map. Use it to highlight your knowledge gaps. The map lists roughly 212 presentations and 315 conditions.
- Download the spreadsheet version (or create a PDF) so you can edit it.
- Rate yourself: Go through the “Conditions” and “Presentations” columns and colour code them:
- 🔴 Red: “I have never heard of this” or “I would fail a station on this.”
- 🟠 Amber: “I know the basics, but I couldn’t teach it to someone else.”
- 🟢 Green: “I could teach this to another medical student.”
- Action: Your revision schedule should prioritise covering the Red topics first, then the Amber topics. Do not waste time revising Green topics until you solidify your knowledge on the others.
2. Connect the Domains
The Content Map is split into 6 Domains. A common mistake is studying them in isolation. The exam tests your ability to link them.
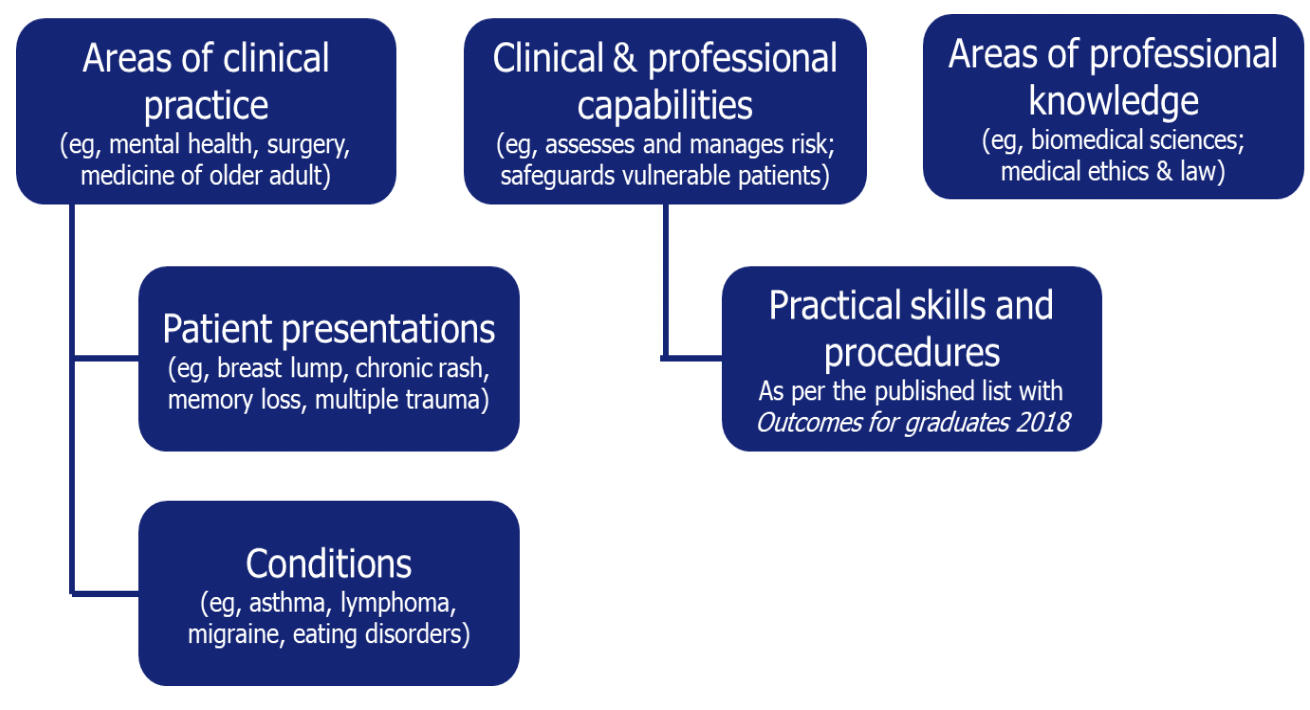
From UKMLA Content Map
To link domains effectively, when revising a condition, force yourself to link it to a presentation, a capability, and professional knowledge.
For example:
Condition: Asthma
Link to Presentation: ‘Breathlessness’ or ‘Wheeze.
Link to Capability: ‘Prescribing’ (inhaler technique) or ‘Managing Uncertainty’ (when to admit vs. discharge).
Link to Professional Knowledge: ‘Social determinants’ (housing, pollution).
3. Consider the difference between the AKT and CPSA
The map is useful for the two parts of the MLA:
For the AKT: Focus on Conditions and Professional Knowledge. Ensure you know the guidelines (NICE) for every condition listed.
CPSA (Clinical/OSCE): Focus on Patient Presentations and Practical Skills. You won’t get a station based on ‘Asthma’ you will get a station based on ‘Breathlessness.’
In your revision, practice taking histories from presentations, not diagnoses.
4. Mark Schemes
The GMCs Good Medical Practice (referenced heavily in the ‘Areas of Professional Knowledge’ domain) principles are used in the CPSA.
- Don’t ignore the ‘soft’ domains: don’t ignore the section on professional requirements.
- Review Sections Relating to Ethics: Specifically look for topics like Safeguarding, Consent, Confidentiality, and Capacity.
- Drill the phrases: Learn the specific GMC-approved phrasing for ethical dilemmas.
5. Relate the Map to Your Question Bank
When you get a question wrong in your Question Bank:
- Don’t just read the explanation.
- Find the section in the MLA Content Map that corresponds to that question.
- Mark that content as Red on your tracker.
Here is the content map:
The best way to revise for the CPSA is to practise scenarios that may come up and the exam format. Many CPSA marks come from ticking boxes, so studying mark schemes can be very helpful. To get the most out of revision, use a variety of videos and textbooks, and practice on others. Many question banks have OSCE revision resources that do all three of these.
The CPSA is divided into six categories, which test different parts of your knowledge and abilities:
1. Clinical Problem Solving
This station will need you to identify, investigate and manage a clinical scenario. It could be based on a history, examination findings or test results, and you may be asked to explain your reasoning.
💡It is important to remember that these exams assess your ability to be a safe doctor. You may do the perfect examination, but if you miss out on an important aspect, you will fail. For example, if you have a patient come in with suspected cervical cancer and don’t suggest a 2-week wait pathway, this would be considered unsafe.
Example:
Scenario: You are the Foundation Doctor (FY1) covering the medical ward. You have been bleeped urgently by the nursing staff to review Mr. Arthur Miller, a 72-year-old male. Mr. Miller was admitted 2 days ago with a lower respiratory tract infection (Community Acquired Pneumonia). The nurse reports that he has deteriorated significantly in the last 30 minutes. He appears drowsy and is struggling to breathe. Your Tasks:
- Perform a structured ABCDE assessment of the patient.Initiate appropriate immediate management based on your findings.Propose a differential diagnosis and investigation plan to the examiner.
Note: You have access to a nursing assistant (the examiner) who can perform tasks (e.g., hanging fluids, taking bloods) only if explicitly instructed by you.
2. Communication Skills
This assesses how well you can communicate with patients and their families. You will be assessed on how well you gather information, handle difficult conversations and build rapport.
💡 Pay attention to your non-verbal communication such as body language. Maintain good eye contact, use open body language and keep a calm tone.
Example:
Frustrated Relative – Delayed Discharge
Scenario: You are an FY1 doctor on a medical ward. Mr. James Peterson’s elderly mother has been medically fit for discharge for 3 days, but social care arrangements are still pending. He is frustrated and angry about the delay and has asked to speak with a doctor.
Candidate Instructions: You have 8 minutes to speak with Mr. Peterson about his mother’s delayed discharge. Address his concerns, explain the reasons for the delay, and attempt to de-escalate the situation.
3. Data Interpretation
During this station, you will be given a patient history and then a data set eg. scan related to the scenario. You may have to interpret the data and communicate the results to the patient. This requires you to understand how to interpret things like ECGs, lab results and radiological images.
💡 Explain and communicate your thought process as this can often get you marks even if you come to the wrong conclusion.
Example:
Chest X-Ray – Pneumothorax
Scenario: Miss Sophie Brown, a 24-year-old tall, thin woman, presents with sudden-onset right-sided chest pain and shortness of breath. Here is her chest X-ray.
Candidate Instructions: You have 6 minutes to interpret this chest X-ray (shows right-sided pneumothorax) and explain your findings to the examiner, including immediate management. Then spend 2 minutes explaining to the patient what you’ve found.
Data Provided: PA chest X-ray showing right-sided pneumothorax
4. Examination
This will test your physical examination skills on a simulated patient (or a model). It requires you to have good understanding of anatomy, physiology and pathology. You will also need to communicate effectively with the simulated patient to explain the examinations you are doing.
Example:
Cranial Nerve Examination
Scenario: Miss Victoria Adams, a 35-year-old woman, presents with facial weakness. Please examine her cranial nerves.
Candidate Instructions: You have 6 minutes to perform a cranial nerve examination. Present your findings and suggest where the lesion might be.
Expected Findings: Lower motor neuron facial nerve palsy (forehead involved – Bell’s palsy)
5. History Taking
For this station, you will be presented with a short brief and then be asked to take a history from the patient. It could be a broader history or a focused history.
Example:
Jaundice History
Scenario: Mr. Paul Richardson, a 55-year-old man, has developed yellow discoloration of his eyes over the past week. Take a focused history.
Candidate Instructions: You have 8 minutes to take a history to determine the cause of jaundice. Explore pre-hepatic, hepatic, and post-hepatic causes.
Hidden Information: Progressive painless jaundice, pale stools, dark urine, weight loss (likely pancreatic cancer – Courvoisier’s law)
6. Procedural Skills
This station will test you on how well you can perform procedures such a venipuncture, cannulation, wound care, urinalysis etc and how well you communicate them to the simulated patient. Often these skills will be done on a model.
💡 You may be asked about complications and adverse effects of these procedures so it is important that you can recognise signs of these and how to react.
Example:
Inhaler Technique – Metered Dose Inhaler
Scenario: Miss Emily Watson, a newly diagnosed asthmatic, needs education on using a salbutamol inhaler. Please demonstrate and teach correct technique.
Candidate Instructions: You have 6 minutes to demonstrate correct MDI technique, teach the patient, and then observe them performing it. Correct any errors and explain when to use it.
💉Guide to Approaching a CPSA Station
Here is a guide that breaks down the CPSA structure into a series of steps. Remember, the CPSA isn’t about clinical knowledge alone but also about structure, safety and communication.
Phase 1: Outside the Station
Time: You will usually have 1 Minute for this so don’t waste it!
Don’t just read the brief passively. Actively extract the data to build your action plan.
- Identify the Station Type: Is this a History, Examination, Procedure, or Communication station?
- Identify the Patient: Age, Name, Gender. (A 72-year-old male vs. a 4-year-old child changes your approach entirely).
- Identify the Task: “Take a history” vs. “Take a focused history and come up with a management plan.”
- Mental Rehearsal: Visualise the first 30 seconds.
💡 Don’t forget to take a deep breath or two before entering.
Phase 2: Enter the Station
Time: First 30 Seconds
First impressions really matter in a CPSA. You are being assessed from the moment you walk in. By using the WIPER mnemonic, you can better handle nerves.
- Wash Hands: Gel your hands visibly, making sure to use the 7 movements of hand washing.
- Introduction: “Hello, I my name is (Full Name), one of the doctors.”
- Permission (Consent): “I’ve been asked to examine your chest, is that okay?”
- Exposure/Positioning: Ensure the patient is sitting/lying correctly for the specific exam.
- Rapport: “Are you in any pain before I begin?”
Phase 3: Structure
Once you are in, it can be helpful to use a framework to avoid getting lost or missing anything. This is why regular practice matters so much, it allows the structure to become almost automatic.
A. Structure For History Stations
Start by asking a broad, open question and give the patient a minute to speak freely. For example: “What has brought you in today?”
- Framework: Presenting Complaint, History of Presenting Complaint (SOCRATES), Past Medical Hx, Drug Hx, Allergies, Family Hx , Social Hx, Systems Review, Red flag symptoms, ICE.
- 💡 Ask about ICE.
- Ideas: “What do you think is going on?”
- Concerns: “What are you most worried about?”
- Expectations: “What were you hoping we could do for you today?”
B. Structure for Examination Stations
Do not just touch the patient. Inspect first.
- General Inspection: Look around the bed (fluids, oxygen, walking aids, sputum pots).
- The Sequence: Inspection, Palpation, Percussion, Auscultation, Special tests
- Or Look, Feel, Move, Special tests
- Or Power, Tone, Reflexes, Co-ordination, Sensation, Special tests
💡 Always remember to offer a chaperone
C. Structure For Acute/Emergency Stations
Never deviate from ABCDE.
- Even if you know the diagnosis is asthma, if you skip A (Airway) and jump to listening to the chest, you may fail on safety.
- Verbalise Everything: The examiner cannot read your mind. Say: “I am looking at the airway. It appears patent. I am measuring the respiratory rate etc.”
Phase 4: Advanced Communication Skills
These techniques separate the “barely passed” from the “Full Marks.”
- Signposting: Tell the patient/examiner what you are going to talk about next. This can also really help examiners with marking.
- Example: “I have finished asking about your pain. Now I need to ask a few questions about your lifestyle.”
- Chunk and Check: When giving information, give a small amount, then check understanding.
- Example: “That was a lot of information. Just to check we are on the same page, could you tell me what you understand so far?”
💡 Don’t fear silence. If a patient (actor) becomes emotional, wait. Hand them a tissue. Saying nothing is often the best way to communicate.
Phase 5: The Exit (Summary & Plan)
Time: Last minute
- Summarise: “To recap, you’ve had chest pain for 2 days…”
- Safety Net: Tell them what to do if things get worse.
- The Plan: Tell them what your next steps will be.
- “I will discuss this with my senior.”
- “We will order some blood tests.”
- Final Questions: “Do you have any questions? Thank you.” Wash your hands again.
⚠️ Red Flags (How to Fail)
Avoid these at all costs. These are often “Automatic Fails” regardless of how good your medical knowledge is.
| Red Flag | Example |
|---|---|
| Patient Safety | Not checking for allergies before prescribing. |
| Consent | Palpating a painful abdomen deeply without asking first. |
| Lying | Making up vital signs you didn’t measure. |
| Tunnel Vision | Focusing on the information you need and ignoring the patient talking to you. |
| Hand Washing | Not washing hands before touching a patient. |
Pastest has a comprehensive online CPSA revision resource. Alongside an OSCE question bank, they have OSCE skills videos, spot diagnosis questions and patient OSCE scripts.
Resits
If you fail the MLA, you will not be able to graduate. Your medical school will confirm your resit policy; however, recommendations are that you have no more than 4 valid attempts at the AKT. Because students are only allowed two actual attempts at the assessment in one academic year, the four valid sits will likely need to take place over two academic years. Refer to your medical school resit policy for further guidance.
Step 2: Choose Your Study Resources for the UKMLA
Question Banks
Question banks are an excellent way to revise for the exam; however, if they are the only thing you use to revise, you run the risk of getting through exams by pattern recognition rather than having the in-depth knowledge needed to be a good foundation doctor.
And many, many more…
Here is an example of the Pastest layout:
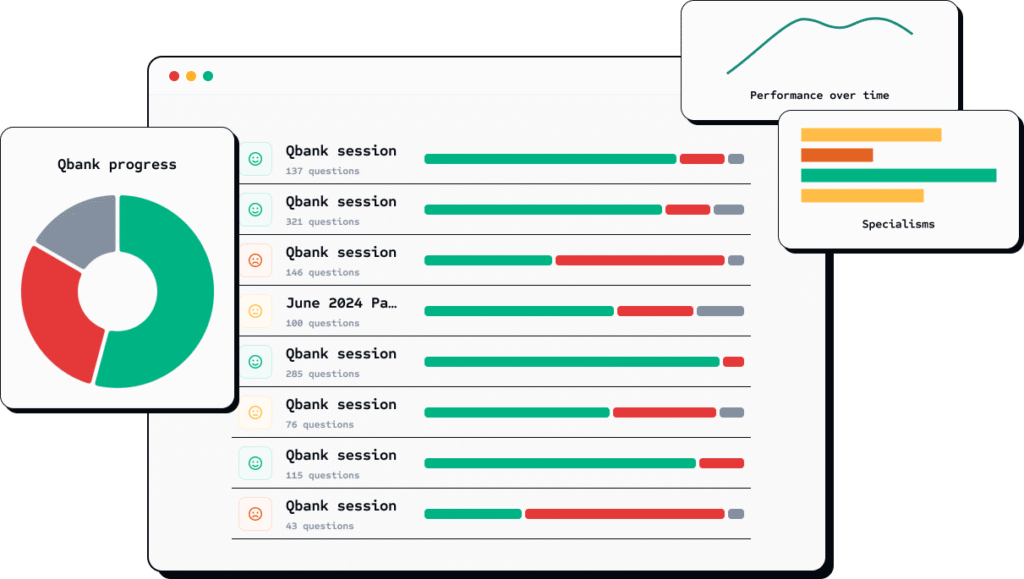
Pastest is one of the most established UK medical question banks, and is perfect for exam revision. One of the key things that makes it stand out is the flow between the textbook and the questions, which lets you learn and study simultaneously. Another great addition to the textbook is 3D anatomy diagrams, so you can keep up to date with your anatomy. The dashboard tracks your progress and highlights areas for improvement.
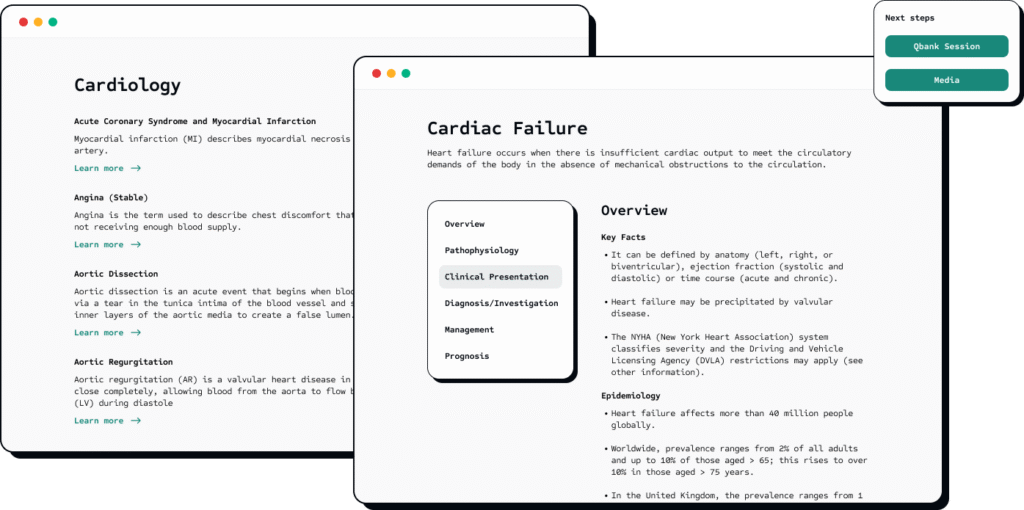
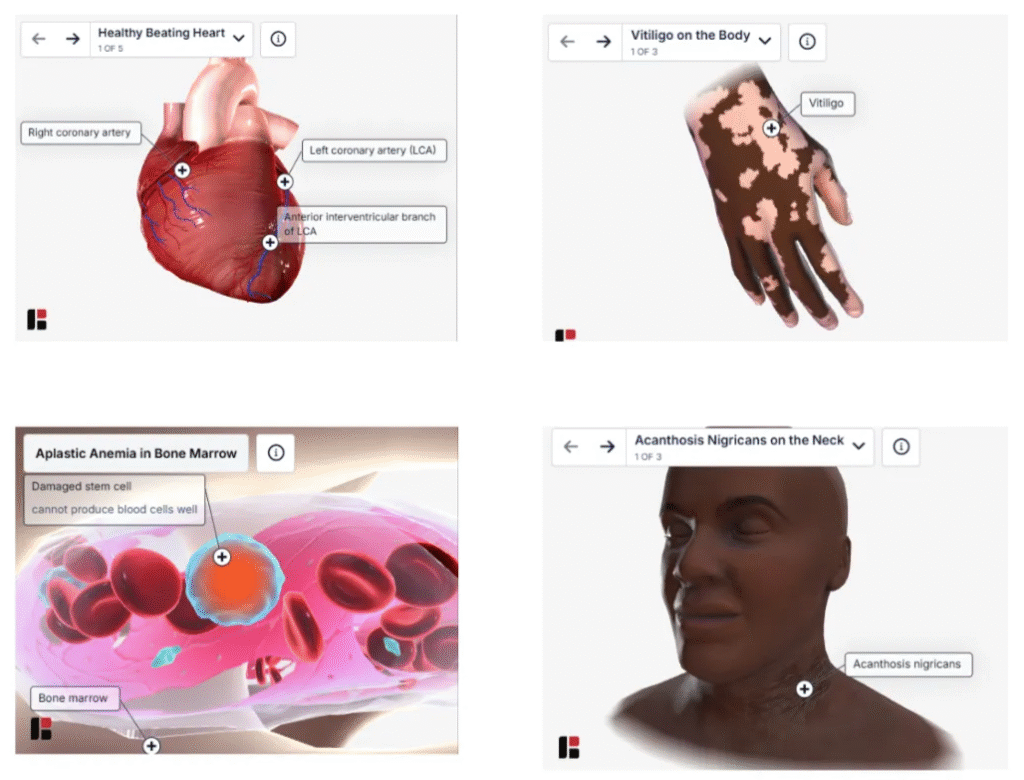
Pastest Qbank and 3D anatomy diagrams
Knowledge Resources
These are some great resources for building knowledge foundations to help you answer questions.
Online Platforms:
- AMBOSS
- Radiopaedia
- Zero to Finals
- ABG Ninja
- In2Med
- Haembase
- DermNet NZ
- GPnotebook
- Life in the Fast Lane (LITFL)
- Pulse Notes
Study Aids
Flashcards:
- Anki
- iatroX Quiz
- Create your own flashcards for weak areas
Video Resources:
Step 3: Understanding Your Learning Style
There is no denying the fact that most people find exams hard, and although there are many out there, very few resources will tell you ‘how’ to revise. Of course, if you have gone to medical school, you will have a rough idea, but different exams require different revision techniques, and there is no one-size-fits-all approach.
Before you dive into elaborate revision timetables and invest in question banks, it is worth understanding the science behind effective learning. Research consistently shows that certain study methods are far more effective than others. Many will still rely on techniques that feel productive but, in reality, are very time-consuming.
Mock Tests: Using Active Recall
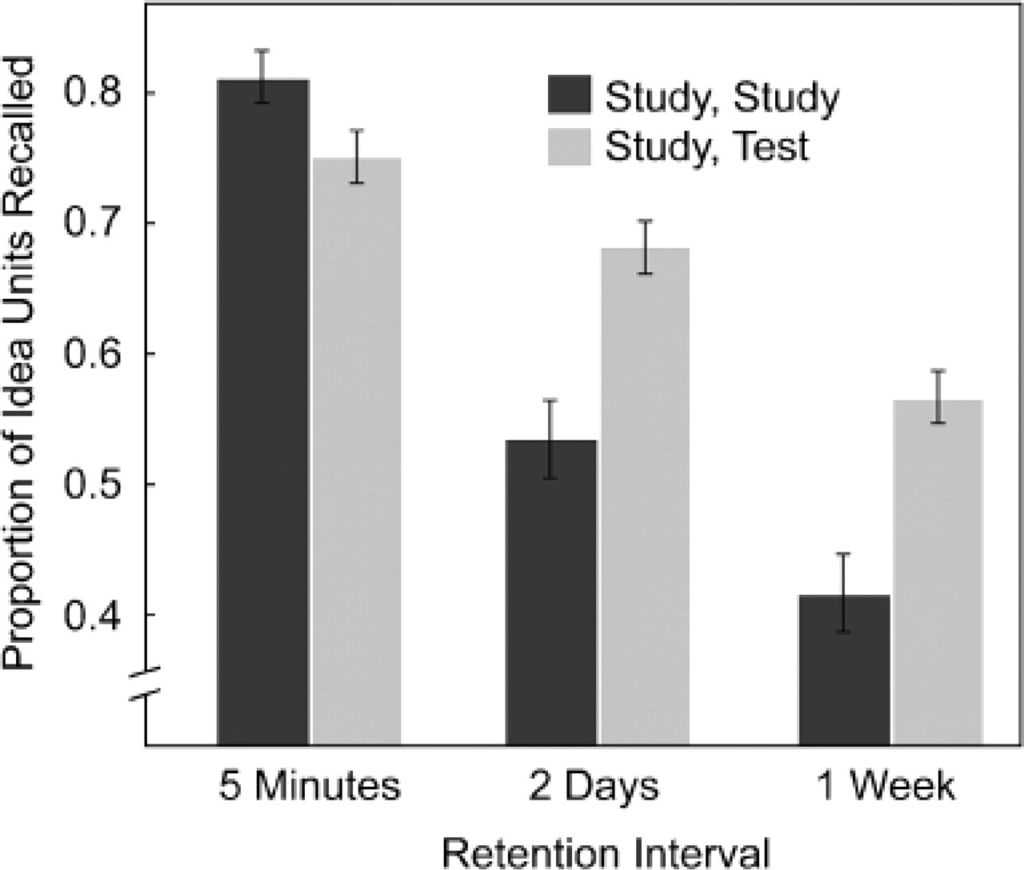
Arguably, one of the most robust findings in educational psychology is the testing effect. This is based upon the principle that retrieving information from memory actually strengthens that memory more than just re-reading material alone would. In fact, a study by Roediger and Karpicke (2006) showed that students who tested themselves retained 50% more information after one week than the group that repeatedly studied the material. This is despite the fact that the group that did repeated studying had more confidence in their ability to remember the material.
When it comes to exams, this means that practising questions isn’t just for exam technique (which we will come to later), but it is actually one of your most effective revision strategies. Platforms like Pastest’s question banks are designed specifically around this principle, offering thousands of exam-style questions that force active recall and strengthen your knowledge base with every attempt.
💡Highlighting and reading notes feels easier because it’s passive learning. Active recall tests yourself and forces your brain to retrieve information, strengthening the neural pathways so it becomes easier to remember later. Just like learning a new route, it feels effortful at first, but soon becomes automatic and reliable in exams.
Spaced Repetition: Working With Your Brain’s Biology
You may have noticed that your brain forgets information over time. There is actually a name for it – Ebbinghaus’s forgetting curve.
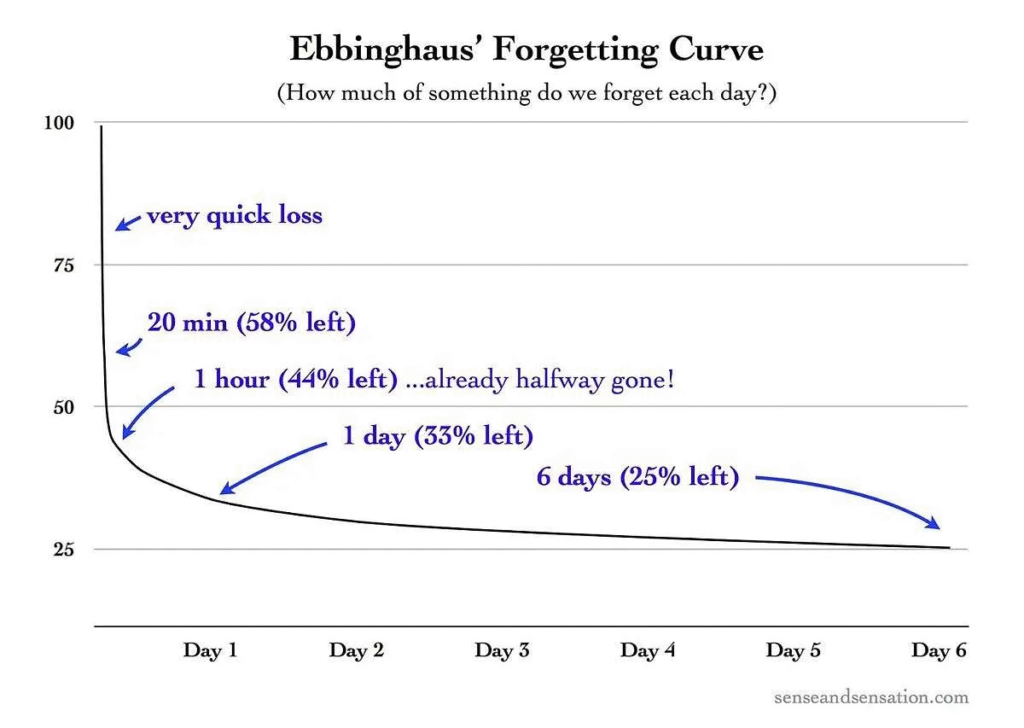
Hermann Ebbinghaus was a German psychologist in the 1880s, and his work remains relevant today. He demonstrated that after learning new information, we experience a sharp decrease in memory, followed by a more gradual decrease in retained information over time. This is where spaced repetition comes in. Research shows that spaced repetition can double long-term retention in comparison to learning the information once.
The optimum approach is often cited as:
- Initial learning of new material
- First review after 1 day
- Second review after 3 days
- Third review after 1 week
- Subsequent reviews at increasing intervals
More Scientifically proven Study Techniques
- Interleaved Practice: Mixing It Up
It can be very tempting to study topics in blocks; however, in the exam, the topics won’t all be lumped together. Research shows that interleaved practice, or mixing different topics during study sessions, produces better long-term retention and knowledge transfer.
For your revision, this means alternating between subjects and clinical scenarios rather than spending entire days on a single topic.
- Elaboration: Making Connections That Stick
Elaboration means actively linking new information to what you already know. Instead of memorising facts in isolation, ask yourself why something works or how it connects to other topics.
Studies show that explaining ideas in your own words, known as elaborative interrogation, improves recall and understanding far more than rote memorisation (Pressley et al., 1987).
- Dual Coding: Words Meet Pictures
Dual coding means combining words and visuals to strengthen memory. By pairing text with diagrams, charts or concept maps, your brain processes the information through two channels: verbal and visual. This makes it easier to remember and understand (Paivio, 1990).
For example, if you are studying anatomy, drawing a labelled diagram alongside your notes can boost both comprehension and retention. The key is to keep visuals clear and simple.
- The Feynman Technique: Learn by Teaching
The Feynman Technique is all about explaining complex ideas in simple terms. The idea is to teach a concept as if you were explaining it to someone with no background knowledge. If you get stuck or your explanation sounds confusing, that is where your understanding needs work.
Research shows that teaching others enhances comprehension and long-term memory more effectively than passive review (Fiorella & Mayer, 2013).
⏳ Step 4: Create a Revision Timetable
Create yourself a revision timetable that takes into account the time that you have left and the content you want to prioritise covering. Below is an example template for a 3 month timetable.
(Note: This timetable is just an example and is not exhaustive of all content)
Month 1
| Week | Days 1–5 (AKT Focus) | Days 6–7 (CPSA Focus) |
|---|---|---|
| W1 | Cardiology (Ischaemia, HF, Arrhythmias) & Respiratory (PE, Pneumonia) | 🗣️ History Taking: Chest Pain, SOB. Ethics: Consent & Capacity. |
| W2 | Gastroenterology (Acute abdomen, IBD, Liver failure) & Renal (AKI, CKD, Electrolytes) | Examination: Abdomen, Cardiovascular, Respiratory. Law: Confidentiality. |
| W3 | Neurology (Stroke, Headache, Seizures) & Endocrinology (DKA, Thyroid, DM management) | 📋 Procedure Skills: Cannulation, ABG sampling. Ethics: Duty of Candour. |
| W4 | Infectious Diseases (Sepsis, Antibiotics, HIV) & Haematology (Anaemia, Coagulation) | ✍️ Communication: Explaining results, Breaking bad news. Law: Professional Misconduct (GMC). |
Month 2
| Week | Days 1–5 (AKT Focus) | Days 6–7 (CPSA/Ethics Focus) |
|---|---|---|
| W5 | Paediatrics (Newborn, Fever, NICE guidelines) & Genetics | 👶 Paediatric Skills: Developmental assessment. Ethics: Safeguarding (Child & Adult). |
| W6 | Obstetrics & Gynaecology (Antenatal, Bleeding, Contraception) | 🚺 Gynaecology Skills: Speculum exam, Vaginal bleeding history. Law: Abortion/Fertility Law. |
| W7 | Psychiatry (Risk assessment, Psychosis, Mood disorders) & Geriatrics (Delirium, Dementia, Falls) | 🧠 Psychiatry Skills: Mental State Exam (MSE). Ethics: Mental Health Act. |
| W8 | Trauma, Orthopaedics, & Anaesthetics (Fractures, Pre- op assessment, Pain relief) | ⚙️ Trauma Skills: Fracture X-ray interpretation, primary survey review. Ethics: Resource allocation. |
Month 3
| Week | Days 1–5 (AKT Focus) | Days 6–7 (CPSA/Ethics Focus) |
|---|---|---|
| W9 | Targeted Review: Focus on highest-yield areas (e.g., Sepsis, DKA, Top MLA Conditions). | CPSA Simulation: Run 3 full scenarios (1 History, 1 Exam, 1 Communication. Get feedback. |
| W10 | FULL MOCK AKT 1: Complete a full 200 question AKT mock under strict timing. | MOCK Review: Spend the weekend meticulously reviewing all weak areas identified in the mock. |
| W11 | Final High-Yield Review: Concentrate on Pharmacology, Public Health (Screening), Paeds Immunisations, and Dermatology. | CPSA Simulation: Run 4 full scenarios. Focus on time management and clear advice giving. |
| W12 | FULL MOCK AKT 2: Complete a second full AKT mock. Final AKT Review: Light review of notes. | REST & LIGHT REVIEW: Review CPSA scenarios and key ethics notes. Crucially, rest and relax. |
- Use Spaced and Interleaved Practice: Rotate subjects and briefly review old material each week to keep it fresh. Avoid spending multiple consecutive days on a single topic; integrate it with other subjects to reinforce learning and maintain variety (Cepeda et al., 2006; Kornell & Bjork, 2008).
- Include Breaks and Rest Periods: Short, focused sessions with regular breaks maintain concentration and boost retention (Boettcher et al., 2021; Walker, 2005). The Pomodoro Technique, 25 minutes of study followed by a 5-minute break, can help manage fatigue and motivation.
Tip: After four Pomodoros, take a longer 20 to 30 minute rest before switching topics.
- Prioritise Weak Areas: Targeting your weakest topics improves overall performance through self-regulated learning (Davis et al., 2006).
Tip: After each test or mock, identify problem areas and schedule them early in your next study block.
💡Throughout your revision, try to maximise time on placement, using cases to prompt revision – maybe choosing one case per day to focus on for 5-10 minutes. If you get public transport to your placement, you could also use the time you spend commuting to study.
😁 Step 5: Look After Your Physical and Mental Health
It is very easy to reach burnout when revising for exams, however, if you go into exams burnt out, it can really be quite detrimental to your results. Therefore, it is important to pace yourself and revise in manageable chunks. Try to take regular breaks and continue doing things you enjoy.
Final Preparation Checklist
4 Weeks Before Exam
- Completed at least 3,000 practice questions
- Taken minimum 4 full-length mock exams
- Reviewed all incorrect answers systematically
- Created summary notes for all weak areas
- Comfortable with all high-yield topics
- Practiced under timed conditions regularly
2 Weeks Before Exam
- Taking weekly full-length mocks
- Scores consistently in target range (>70%)
- Refined exam technique and timing
- Reviewed NICE guidelines for common conditions
- Consolidated professional knowledge topics
1 Week Before Exam
- Final mock exam completed
- Focused revision of persistent weak areas
- Light review
- Confirmed exam venue and timings
- Thought out route to exam
- Sleep schedule optimised
Day Before Exam
- Light review of summary notes
- Stethoscope, ID, watch for CPSA
- Formal clothes/ scrubs for CPSA clean
- Route to venue planned
- Adequate sleep (7-8 hours)
- Meals planned for exam day
- Relaxed and confident mindset
Exam Day
- Nutritious breakfast eaten
- Arrived early at venue
- All required documents/ID present
- Stethoscope, ID, watch for CPSA
- Mentally prepared and focused
- Hydrated and comfortable
- Ready to demonstrate your hard work!
💭FAQ’s
What is the UKMLA and who needs to take it?
The UKMLA is a licensing exam required by the GMC for all UK medical graduates, as well as international medical graduates who wish to practise in the UK. It consists of two parts: the Applied Knowledge Test (AKT), which assesses medical knowledge, and the Clinical and Professional Skills Assessment (CPSA), which evaluates practical clinical and professional skills.
How about the Prescribing Safety Assessment (PSA)?
The PSA is separate from the UKMLA. It specifically assesses competence in safe prescribing, including prescription writing, dosage calculations, and error prevention. Most UK medical schools require a pass in the PSA for graduation or Foundation Programme entry.
Can you resit the UKMLA exams if you fail?
Your medical school will confirm your resit policy; however, recommendations are that you have no more than 4 valid attempts at the AKT. Because students are only allowed two actual attempts at the assessment in one academic year, the four valid sits will likely need to take place over two academic years. Refer to your medical school resit policy for further guidance.
📚Resources:
UKMLA: Practice exam for the MS AKT Official website
GMC: UK students’ guide to the MLA
GMC: MLA Content map
GMC: Guide to the UKMLA
Pastest: OSCEs Complete Guide